You’ve set up a Minecraft server for your friends. You’ve built a home media server with Plex. Or maybe you want to access your home security cameras while you’re on vacation.
You follow the setup guide, and it hits you with a term that sounds like advanced cybersecurity jargon: “You will need to configure port forwarding on your router.”
Cue the panic.
Don’t worry. Despite the intimidating name, port forwarding is a straightforward process. It’s simply a way of telling your router exactly where to send specific types of internet traffic.
Think of your home network like a large apartment building. Your router is the building’s front desk, and your public IP address is the building’s street address. When data (mail) arrives from the internet, the router knows which apartment (your phone, laptop, or game console) to send it to.
But what if someone from the outside wants to send mail directly to a specific resident (like your Plex server)? The front desk doesn’t know who to give it to, so it blocks it. Port forwarding is simply leaving a note at the front desk saying: “Any mail labeled ‘Port 32400’ goes directly to Apartment 192.168.1.50.”
Here is your complete, step-by-step guide to setting up port forwarding safely and effectively.
⚠️ The Golden Rule: Security First
Before we begin, a crucial warning: Port forwarding literally punches a hole in your router’s firewall.
You are creating a direct path from the public internet to a specific device inside your home. Only forward ports if absolutely necessary, and only for applications you trust. Never forward ports to a device that contains sensitive financial or personal data unless it has its own robust security (like strong passwords and encryption).
🛠️ Step 1: Assign a Static IP to Your Target Device
Routers hand out “dynamic” IP addresses (like
192.168.1.15) to devices, and these can change when the device reconnects. If your server’s IP changes, your port forwarding rule will break. You need to give it a permanent, “static” IP address.The Best Way (DHCP Reservation): Instead of manually changing settings on the device itself, tell your router to always give that specific device the same IP.
- Log into your router’s admin panel (usually
192.168.1.1or192.168.0.1). - Look for LAN Settings, DHCP Server, or Address Reservation.
- Find your target device in the list of connected devices (e.g., “Johns-PC” or “Plex-Media-Server”).
- Assign it a permanent IP address (e.g.,
192.168.1.50) and save. (Note the IP address you choose; you will need it in Step 4).
🌐 Step 2: Find the Port Forwarding Menu
Every router manufacturer uses slightly different terminology. Log into your router’s admin panel and look for a section labeled:
- Port Forwarding
- Virtual Servers (Common on TP-Link)
- NAT / QoS or NAT Forwarding (Common on Asus)
- Applications & Gaming (Common on Netgear)
- Advanced Settings > Security
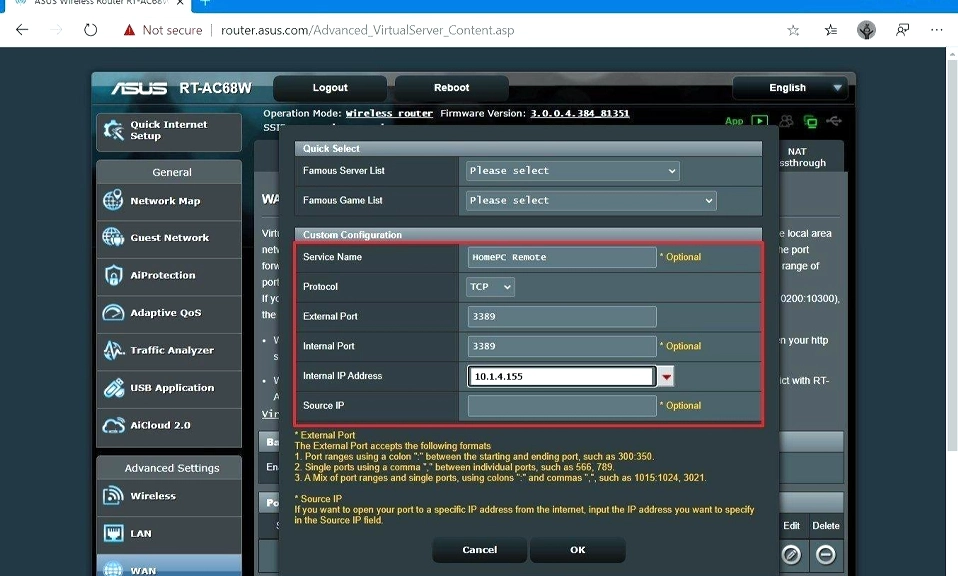
📝 Step 3: Create the Port Forwarding Rule
Click “Add New Rule” or “Add Service.” You will be prompted to fill out a few fields. Here is what they mean:
- Service Name: Give it a recognizable name (e.g., “Minecraft,” “Plex,” “Security-Cam”).
- Internal IP Address: Enter the static IP you created in Step 1 (e.g.,
192.168.1.50). - External Port / Internal Port: This is the specific “mailbox” number.
- External Port: The port the internet will use to reach you.
- Internal Port: The port the device is actually listening on.
- (Usually, these are the exact same number. For example, Minecraft uses
25565, Plex uses32400, and HTTP web traffic uses80).
- Protocol: Choose TCP, UDP, or Both.
- TCP is for reliable data (web browsing, file transfers, remote desktop).
- UDP is for speed over reliability (VoIP, gaming, live streaming).
- Check your application’s documentation to see which one it requires. If unsure, select “Both” or “TCP/UDP”.
💾 Step 4: Save and Reboot
Click Save or Apply. Your router may take a few seconds to process the rule. Some older routers require a full reboot to apply NAT changes, so if it doesn’t work immediately, give the router a quick power cycle.
🔍 Step 5: Test Your Configuration
Did it work? The easiest way to check is from outside your network.
- Disconnect your computer from Wi-Fi and use your phone’s cellular data (or ask a friend to check).
- Go to a free testing website like CanYouSeeMe.org or PortChecker.co.
- Enter the port number you just forwarded (e.g.,
25565) and click “Check.” - If it says “Success” or “Open,” congratulations! You did it. If it says “Error” or “Closed,” double-check your target device’s IP address, ensure the application is actually running, and verify your router’s firewall isn’t blocking it.
💡 Pro Tips & Modern Alternatives
- Beware of UPnP: Many routers have a feature called Universal Plug and Play (UPnP) that automatically forwards ports for applications that request it. While convenient, UPnP is a known security risk, as malware can use it to open ports without your permission. It is highly recommended to disable UPnP and forward ports manually.
- The Modern, Safer Alternative (ZeroTier / Tailscale): If you are port forwarding just to access your own files, games, or servers remotely, consider using a Virtual LAN (VPN) tool like Tailscale or ZeroTier. These free tools create a secure, encrypted tunnel directly between your devices, completely bypassing the need to open any router ports. It is vastly more secure and often easier to set up than traditional port forwarding.
- Check Your Public IP: If your Internet Service Provider changes your public IP address (which many do), your external access will break. You may need to set up a free Dynamic DNS (DDNS) service (like No-IP or DuckDNS) to give your home network a permanent, easy-to-remember web address (e.g.,
myserver.ddns.net).
You Are in Control
Port forwarding sounds like something only network engineers do, but with a little patience, any home user can master it. By assigning a static IP, creating a precise rule, and testing it from the outside, you can unlock the full potential of your home network.
Just remember the golden rule: only open the doors you absolutely need, keep your device’s software updated, and enjoy your newly connected world.