You’ve just unboxed your shiny new Wi-Fi router. You’re staring at the antennas, the tangled Ethernet cables, and the blinking lights. It looks intimidating. You might even be thinking, “Do I need to call a tech guy to do this?”
Take a deep breath. You don’t.
Setting up a router used to be a nightmare of confusing web portals and technical jargon. But in 2026, manufacturers have made the process almost foolproof. Think of it less like defusing a bomb and more like assembling a very simple piece of digital Lego.
Here is your complete, step-by-step, jargon-free guide to setting up your new Wi-Fi router and taking control of your home network.
📍 1. Pick the Perfect Spot (Before You Plug Anything In)
The biggest mistake people make is setting up the router and then realizing it’s in a terrible location. Wi-Fi signals are radio waves, and they hate obstacles.
- The Golden Rules: Place your router in a central, elevated location.
- What to avoid: Don’t hide it inside a closed wooden TV cabinet. Don’t put it on the floor. Keep it away from thick concrete walls, metal filing cabinets, microwaves, and yes, even large fish tanks (water absorbs Wi-Fi signals!).
- The Goal: Give the router a clear, high-up vantage point to broadcast its signal in all directions.
🔌 2. The Physical Connections (The Hardware Phase)
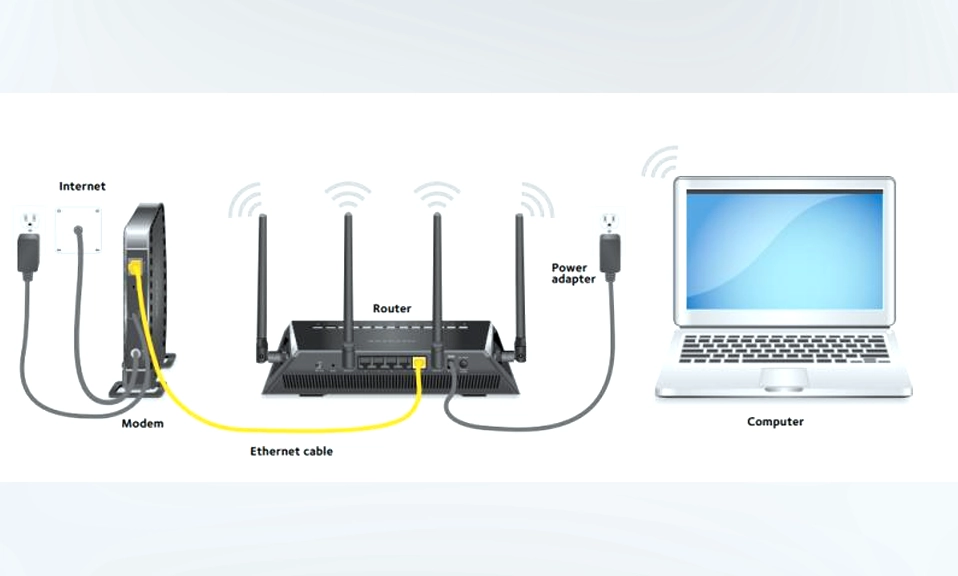
Quick note: Your modem brings the internet into your house from the street. Your router takes that internet and broadcasts it through the air.
- Power down the modem: Unplug your modem from the wall outlet. (This is a crucial step most people skip! If you don’t reset the modem, it might hold onto the “memory” of your old router and refuse to talk to the new one).
- Connect the modem to the router: Take the Ethernet cable included in the box. Plug one end into the back of your modem, and the other end into the port on your new router labeled “Internet,” “WAN,” or “Network.” (It’s usually a different color, often yellow or blue, and separated from the other ports).
- Power up: Plug your modem back into the wall. Wait 2 to 3 minutes for all its lights to stabilize.
- Turn on the router: Plug your new router into a power outlet and turn it on. Wait another 2 to 3 minutes until the main LED light turns solid (usually white or green).
📱 3. The Digital Handshake (App vs. Web Browser)
Now it’s time to tell the router how to behave.
The Modern Way (The Mobile App): Most new routers (like Eero, TP-Link Deco, or Asus) come with a dedicated smartphone app.
- Download the app from your phone’s app store (the name will be on the router’s box).
- Create an account.
- The app will automatically detect your new router via Bluetooth. Just follow the on-screen prompts. It’s literally as easy as setting up a smart speaker.
The Classic Way (Web Browser): If your router doesn’t have an app, or you’re setting it up on a desktop PC:
- Look at the sticker on the bottom or back of your router. It will list a default Wi-Fi name (SSID) and password, as well as a web address (like
routerlogin.netor192.168.1.1). - Connect your computer or phone to that default Wi-Fi network.
- Open a web browser and type in that web address.
- Log in using the default admin username and password (also on the sticker).
🏷️ 4. Name Your Network (SSID) and Secure It
The setup wizard will ask you to name your Wi-Fi network (the SSID) and create a password.
- The Network Name (SSID): Have some fun with it! Just avoid using your actual name, your address, or your apartment number (e.g., “SmithFamily_Apt4B” is a bad idea for privacy). Try something like “The LAN Before Time,” “FBI Surveillance Van,” or simply “MyAwesomeWiFi.”
- The Password: This is where you need to be serious. Create a strong password with a mix of letters, numbers, and symbols.
- Security Protocol: If the router asks you to choose a security type, always select WPA3 (the newest and most secure) or WPA2-AES. Never choose WPA or WEP; they are outdated and easily hacked.
⚙️ 5. The “Set It and Forget It” Tweaks
Before you close the app and celebrate, take two minutes to do these three crucial housekeeping tasks:
- Update the Firmware: Just like your phone needs iOS or Android updates, your router needs firmware updates to patch security holes and improve speed. Look for a “Firmware Update” button in the app or settings and run it immediately. (The router will reboot; this is normal).
- Enable a Guest Network: This creates a separate Wi-Fi bubble for your visitors. It keeps them off your main network, meaning they can’t accidentally access your personal computers or smart home hubs.
- Secure your IoT Devices: If you have “dumb” smart home devices (like cheap smart bulbs or plugs), connect them to the Guest Network, not your main network. They are notoriously insecure and are a common backdoor for hackers.
You Are Now the Master of Your Domain
That’s it. You’ve done it.
By taking 20 minutes to properly place, connect, and configure your new router, you’ve just secured your digital home, boosted your internet speeds, and banished the dead zones.
You no longer have to rely on the default, clunky settings provided by your Internet Service Provider. You are in the driver’s seat. Enjoy the blazing-fast, rock-solid Wi-Fi—you earned it!