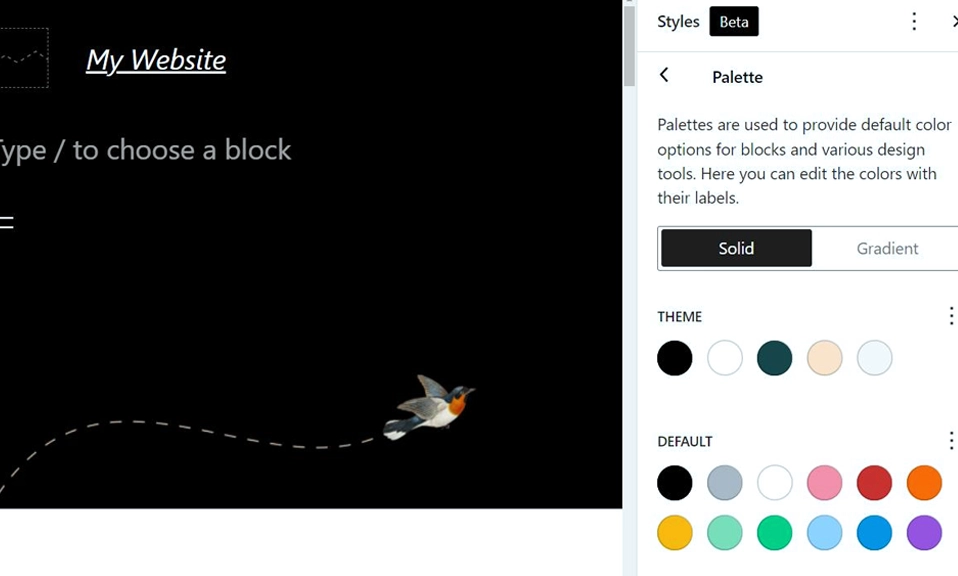
You can create a custom WordPress theme without starting from a blank PHP project. With a block theme and the Full Site Editor, you can design the header, footer, templates, navigation, typography, colours and reusable patterns directly in the WordPress dashboard, then export the result as a theme ZIP file.
The approach works because a block theme uses blocks for the major parts of a site, including navigation, headers, content and footers. The Site Editor is available when a block theme is active. Classic themes built around PHP templates do not provide the same Site Editor workflow.
This tutorial shows a practical workflow for building a small custom theme called Harbour. You can replace the name, colours and content with your own design.
What you will build
By the end, your theme will have:
•A custom global colour and typography system.
•A reusable header with site branding and navigation.
•A reusable footer.
•A custom home page layout.
•A single-post template.
•An archive template for lists of posts.
•A 404 page.
•At least one reusable pattern.
•An exportable theme ZIP file.
You can complete most of the work without code. A small amount of JSON and HTML is useful if you want to initialise a theme folder, make repeatable changes or store the theme in Git.
Before you begin
Use a development site, staging site or local WordPress installation. Do not experiment with a new theme directly on a business site without a tested backup.
You need a recent WordPress installation with a block theme activated. From the dashboard, go to Appearance > Themes > Add New, choose Block Themes, install a suitable theme and activate it. Once the block theme is active, open Appearance > Editor to access the Site Editor.
A block theme changes the workflow from the older Customizer-based approach. Instead of editing separate widget areas and menu screens, you work with blocks inside templates, template parts, styles and patterns.
Step 1: Choose a starting block theme
You have three sensible starting points.
The easiest option is to select a minimal block theme from the WordPress theme directory. This gives you a working theme, starter templates and an existing design system that you can customise.
The second option is to use the default block theme that ships with WordPress and make a copy of its design through the Site Editor. This is useful when you want to learn by inspecting a complete, well-supported theme.
The third option is to create a minimal theme folder yourself. This is the best choice when you want a clean, named theme that you can version-control from the first day.
For this tutorial, start with a block theme in the dashboard if you are new to WordPress. Later, you can export your customised result. If you prefer to start from code, use the minimal structure shown below.
Step 2: Create the minimal block-theme folder
A minimal block theme needs a style.css file and a templates/index.html file. WordPress’s developer documentation also identifies theme.json as the file used to configure global settings and styles, although it is technically optional in the smallest possible theme.
Create this folder structure on your computer:
Plain Text
harbour/ ├── style.css ├── theme.json └── templates/ └── index.html
Add this header to style.css:
CSS
/* Theme Name: Harbour Author: Your Name Description: A custom block theme created with the WordPress Site Editor. Version: 1.0.0 Requires at least: 6.6 Requires PHP: 7.4 Text Domain: harbour */
The stylesheet header gives WordPress the basic theme metadata. You can add custom CSS later, but use theme.json and block styles first when the design can be expressed through the standard WordPress settings system.
Create theme.json with a small initial design system:
JSON
{ "$schema": "https://schemas.wp.org/trunk/theme.json", "version": 2, "settings": { "appearanceTools": true, "layout": { "contentSize": "720px", "wideSize": "1180px" }, "color": { "palette": [ { "slug": "ink", "color": "#17212b", "name": "Ink" }, { "slug": "paper", "color": "#fffaf2", "name": "Paper" }, { "slug": "harbour-blue", "color": "#176b87", "name": "Harbour Blue" }, { "slug": "coral", "color": "#e76f51", "name": "Coral" } ] }, "typography": { "fontSizes": [ { "slug": "small", "size": "0.875rem", "name": "Small" }, { "slug": "large", "size": "clamp(2.25rem, 6vw, 4.75rem)", "name": "Display" } ] }, "spacing": { "spacingSizes": [ { "slug": "small", "size": "0.75rem", "name": "Small" }, { "slug": "medium", "size": "1.5rem", "name": "Medium" }, { "slug": "large", "size": "4rem", "name": "Large" } ] } }, "styles": { "color": { "background": "var:preset|color|paper", "text": "var:preset|color|ink" }, "spacing": { "blockGap": "var:preset|spacing|medium" }, "typography": { "fontSize": "1.05rem", "lineHeight": "1.6" }, "elements": { "link": { "color": { "text": "var:preset|color|harbour-blue" } } } } }
The $schema line helps code editors provide validation and suggestions. The settings section controls which design tools appear and defines presets. The styles section applies the default design to the site and its elements.
WordPress describes theme.json as a foundational configuration file for global settings, styles, custom templates, template parts and patterns. The settings you define there are reflected in both the front end and the built-in editors.
Now create templates/index.html:
HTML
<!-- wp:template-part {"slug":"header","tagName":"header"} /--> <!-- wp:group {"tagName":"main","layout":{"type":"constrained"}} --> <div class="wp-block-group"> <!-- wp:query {"query":{"perPage":10,"postType":"post","inherit":true},"displayLayout":{"type":"list"}} --> <div class="wp-block-query"> <!-- wp:post-template --> <!-- wp:group {"layout":{"type":"constrained"}} --> <div class="wp-block-group"> <!-- wp:post-title {"isLink":true} /--> <!-- wp:post-date /--> <!-- wp:post-excerpt /--> </div> <!-- /wp:group --> <!-- /wp:post-template --> </div> <!-- /wp:query --> </div> <!-- /wp:group --> <!-- wp:template-part {"slug":"footer","tagName":"footer"} /-->
This template uses WordPress block markup rather than PHP. The Query block requests posts, Post Template defines the repeated item and the template parts keep the header and footer reusable.
Zip the harbour folder, then go to Appearance > Themes > Add New > Upload Theme. Upload the ZIP and activate it. You can also copy the folder into wp-content/themes on a local development installation.
Step 3: Open the Site Editor
Go to Appearance > Editor. The exact labels can change slightly between WordPress versions, but the Site Editor normally gives you access to styles, pages, navigation, patterns and templates.
The Site Editor lets you edit the entire site with blocks. You can customise global typography, colour palettes and layout, then edit the header, footer and page templates.
Start with the global design rather than styling individual pages one by one.
Step 4: Set the global design system
Open Styles and work through these areas:
Colours
Set the page background, text colour, link colour and accent colour. Use a small palette that reflects the brand. A limited palette makes it easier to keep new pages consistent.
If you created the palette in theme.json, those colours will appear as named presets. If you are working entirely through the editor, you can create the same design visually and export it later.
Typography
Choose the body font, heading font, font sizes and line heights. Set a clear hierarchy for headings rather than making every heading large.
Check long paragraphs on a phone-sized preview. A good desktop setting can become uncomfortable on a narrow screen.
Layout
Set the content width and wide width. The content width controls readable text, while the wide width gives images, banners and feature sections more room.
Block styles
Use the Styles panel to set defaults for buttons, headings, images, lists and other blocks. This lets you create a design system instead of manually repeating the same settings.
The Site Editor can apply styles to individual block types across the site, while template-level changes affect the structure of the current template.
Step 5: Build the header as a template part
Open Patterns and locate the header template part. If your theme already includes one, edit it. If not, choose Add Pattern > Add Template Part and create a header.
Build the header with these blocks:
1.A Group or Row block for the outer container.
2.A Site Logo block.
3.A Site Title block if the logo does not include the name.
4.A Navigation block.
5.An optional button for a key action such as “Contact” or “Subscribe.”
Use the List View to keep the structure clear. Set the outer Group to a wide layout, then use the Row block to align the logo and navigation horizontally.
Save the template part. Because the header is reused, changing it once updates every template that uses it.
If the navigation menu is empty, select the Navigation block and add your pages or custom links. Keep the primary menu short. Put less important links in the footer rather than forcing every destination into the header.
Step 6: Build the footer as a template part
Create or edit the footer template part with a simple structure:
•A Group block for the footer background and spacing.
•A Site Title or logo block.
•A Navigation block for secondary links.
•A Social Icons block if the site needs it.
•A Paragraph block for copyright or contact information.
Avoid putting too much content in the footer. It should help visitors find important secondary destinations without becoming a second sitemap.
Template parts are reusable groups of blocks that are commonly used for site structure, such as headers and footers. In the Site Editor, template parts are managed under Patterns.
Step 7: Design the home page
Go to Pages inside the Site Editor or open the homepage in the editor. Build the page in sections rather than placing every block at the top level.
A simple homepage can use this structure:
Plain Text
Page ├── Header template part ├── Hero Group │ ├── Heading │ ├── Paragraph │ └── Buttons ├── Intro Group ├── Three-column feature section ├── Query Loop for recent posts └── Footer template part
Use Group, Stack, Row and Columns blocks to express layout. Give major sections consistent spacing through presets rather than entering arbitrary pixel values every time.
For the hero section, use a Cover block only when you need a background image or layered content. A plain Group block is often lighter and easier to maintain.
Preview the page at narrow, medium and wide sizes. Check whether headings wrap awkwardly, buttons collide or columns become too narrow.
Step 8: Create the single-post template
Open Appearance > Editor > Templates and select the single-post template. If the theme does not include one, create a new template for a single post.
A useful single-post structure is:
Plain Text
Header Post Featured Image Post Title Post Date and Author Post Content Post Terms Post Navigation Comments Footer
Use the following blocks where appropriate:
•Featured Image for the post’s main image.
•Post Title for the title.
•Post Author and Post Date for metadata.
•Post Content for the article body.
•Post Terms for categories or tags.
•Post Navigation for previous and next links.
•Comments for discussion.
Keep the Post Content block in a readable constrained container. Images and media can be allowed to expand to the wide layout when that improves the article.
Do not place ordinary article text directly into the template. The Post Content block is the dynamic area that displays the content entered in each post.
Step 9: Create archive and 404 templates
The archive template controls category pages, tag pages, author archives and other lists of posts. Use a Query Loop block with:
•A heading that identifies the archive.
•A Post Template block.
•A Post Featured Image block.
•A Post Title block linked to the post.
•A Post Excerpt block.
•A Post Date block.
•Pagination controls.
The 404 template appears when a visitor requests a page that does not exist. Keep it helpful:
•Add a clear “Page not found” heading.
•Add a short explanation.
•Include a Search block.
•Add a Navigation block or links to important sections.
•Consider a Query Loop showing recent posts.
A useful 404 page can turn a dead end into another route through the site.
Step 10: Create reusable patterns
Patterns are reusable arrangements of one or more blocks. Create patterns for elements that will appear repeatedly, such as:
•Newsletter sign-up sections.
•Call-to-action banners.
•Author bios.
•Pricing cards.
•Testimonial sections.
•Related-content panels.
Go to Appearance > Editor > Patterns, choose Add Pattern and create the design. You can mark a pattern as synced when you want changes to the pattern to update its instances across the site. Use a standard, unsynced pattern when you want each insertion to become independently editable.
WordPress lets you edit, duplicate, rename, export or delete patterns from the My Patterns area. A single pattern can be exported as JSON, while multiple patterns can be downloaded as a ZIP file.
Patterns are one of the best ways to make a custom theme practical for nontechnical editors. They provide a controlled starting point without forcing an editor to rebuild a complex section from scratch.
Step 11: Add style variations
A style variation is an alternative version of the theme’s global design. You might create:
•Harbour Blue: light background and blue accents.
•Night Harbour: dark background and light text.
•Coral Signal: warm accent colours for campaign pages.
In a code-based theme, style variations are JSON files in the styles folder. In a visual workflow, you can create a style variation through the theme’s style interface when the theme supports it, or edit the exported theme files afterward.
Keep variations intentional. Changing colours without checking link contrast, buttons, forms and code blocks can create accessibility problems.
Step 12: Export the custom theme
When the design is ready, open the Site Editor’s Tools menu and choose Export. WordPress can export the theme with the templates, template parts and style changes made in the Site Editor.
The downloaded ZIP file is your custom block theme. Install it on a test site before using it on production:
1.Go to Appearance > Themes > Add New.
2.Choose Upload Theme.
3.Select the exported ZIP file.
4.Install and activate it on the test site.
5.Check the homepage, posts, archives, menus, forms, search and 404 page.
6.Confirm that images, fonts and patterns behave as expected.
The export is useful for moving a design between sites and for creating a backup of the theme’s structure. It is not a complete site backup. It does not replace backups of the database, media library, plugin settings, users or content.
What the exported theme contains
A typical custom block theme may contain:
Plain Text
harbour/ ├── style.css ├── theme.json ├── templates/ │ ├── index.html │ ├── single.html │ ├── archive.html │ ├── page.html │ └── 404.html ├── parts/ │ ├── header.html │ └── footer.html ├── patterns/ │ └── harbour-cta.php └── styles/ └── night-harbour.json
The exact export structure depends on the active theme and the changes you made. WordPress documents templates as the files that represent the front-end document structure, parts as reusable sections such as headers and footers, patterns as reusable block arrangements and styles as style variations.
The required core pieces for a block theme are style.css and templates/index.html. theme.json, functions.php, screenshots, patterns, template parts and additional templates are optional according to the theme’s needs.
Common mistakes to avoid
Editing a classic theme and expecting the Site Editor
The Site Editor requires a block theme. If you activate a classic theme, you will normally work with the Customizer, widgets, menus and PHP templates instead.
Making every change at the page level
If the same spacing, colour or header change should apply everywhere, make it globally or in a reusable template part. Page-by-page edits create inconsistency.
Replacing dynamic blocks with static text
A static title inside a template will be the same on every page. Use Post Title, Post Content, Site Title and other dynamic blocks where the value should come from WordPress data.
Installing too many block extensions
Block plugins can add useful components, but every additional plugin can add maintenance, assets and compatibility concerns. Start with core blocks and add only the extensions you actually need.
Forgetting that editor changes can override theme files
The Site Editor can save changes as user customisations. If you later change the theme files, a saved database customisation may continue to override them. Keep track of whether a change belongs in the theme code, the Site Editor or a plugin.
Treating export as a complete backup
A theme ZIP contains design files. It does not contain your full WordPress database or media library. Maintain a separate backup strategy.
A useful development workflow
For a personal site, you can work directly in a staging copy and export when the design is stable.
For a client or long-lived project, use this workflow:
1.Sketch the content structure and page types.
2.Create the colour, typography and spacing system.
3.Build header and footer template parts.
4.Build the single, archive, page and 404 templates.
5.Create reusable patterns.
6.Test responsive layouts and accessibility.
7.Export the theme or copy the changes into a version-controlled theme repository.
8.Test the ZIP on a clean WordPress installation.
9.Keep content and site-specific functionality in plugins where appropriate.
10.Deploy only after a backup and a staging review.
The final point is important. A theme should control presentation. Site-specific functionality, custom post types, integrations and business rules are usually better placed in a plugin so they do not disappear when the theme changes.
The Full Site Editor makes custom
WordPress theme creation much more accessible. You can build global styles, headers, footers, templates, patterns and responsive layouts with blocks, then export the result as a reusable block-theme ZIP.
The most reliable workflow is to start with a block theme, establish the design system in Styles or theme.json, build reusable template parts, create dynamic templates for each content type, add patterns for repeated sections and test the exported theme on a clean site.
You do not need to begin with a large PHP codebase. But you do need to understand the difference between global styles, templates, template parts, patterns and page content. Once those pieces are separated properly, the Site Editor becomes more than a visual customizer: it becomes a practical theme-building workflow.