We’ve all experienced the ultimate modern tragedy: You’re sitting on the couch, streaming a 4K movie flawlessly. You get up, walk down the hall to your bedroom, and suddenly, the video buffers. You step into the bathroom, and your phone shows zero bars.
Welcome to the Wi-Fi Dead Zone.
It’s incredibly frustrating, but it’s also entirely predictable. Wi-Fi signals are just radio waves, and radio waves are notoriously fragile. They get blocked by walls, absorbed by water, and reflected by metal. When your internet works perfectly in the living room but dies in the bedroom, it’s not magic—it’s physics.
The good news? You don’t necessarily need to pay your internet provider for a faster plan to fix this. You just need to outsmart the physics. Here is your step-by-step guide to eliminating Wi-Fi dead zones, ranging from free tweaks to the ultimate hardware upgrades.
🆓 Phase 1: The Free Fixes (Tweak What You Have)
Before you spend a single dime on new gear, try these zero-cost adjustments. You’d be surprised how much of a difference they can make.
1. Rescue Your Router from “Router Jail” If your router is shoved inside a closed wooden TV cabinet, tucked behind a massive metal flat-screen, or sitting on the floor in a corner, you are choking its signal.
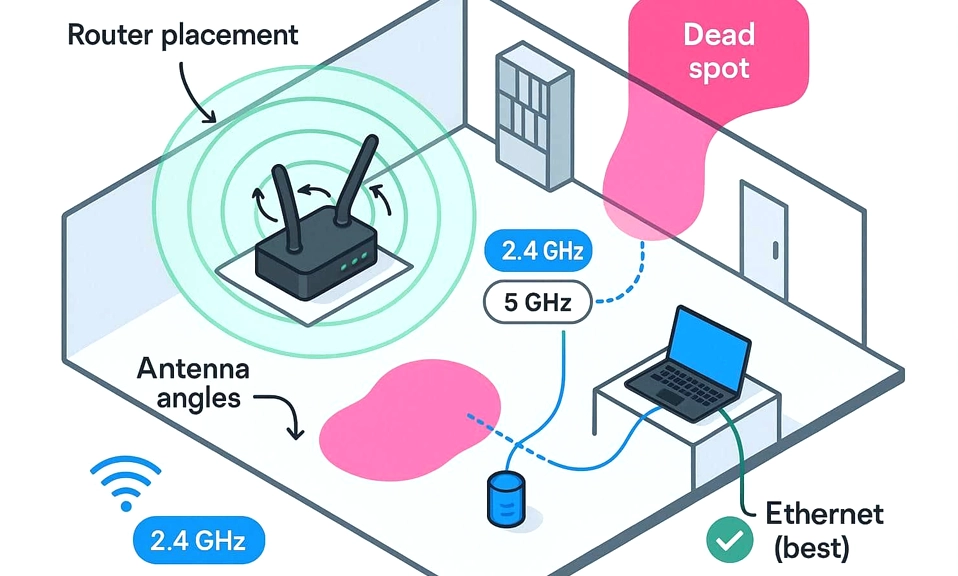
- The Fix: Move the router to a central, elevated, and open location. Put it on a high shelf or mount it to the wall. Wi-Fi signals broadcast outward and downward; elevating the router gives the signal a clear path to travel.
2. The “Halfway” Rule for Extenders If you already own a Wi-Fi extender but it’s not working, you’re probably placing it wrong. A common mistake is putting the extender inside the dead zone. But if the extender can’t get a signal from the main router, it has nothing to repeat!
- The Fix: Place the extender exactly halfway between your main router and the dead zone. It needs to be in a spot where it still gets a strong signal from the router, so it can “throw” that signal the rest of the way into the dead zone.
3. Adjust the Antennas (The 90-Degree Trick) If your router has external antennas, don’t just point them all straight up in the air. Wi-Fi signals broadcast perpendicular to the antenna.
- The Fix: If you have a single-story home, point all antennas straight up. But if you are trying to get Wi-Fi to a floor above or below the router, point one antenna straight up, and bend the other one completely horizontal (parallel to the floor). This broadcasts the signal both across the room and up through the ceiling.
4. Force the 2.4GHz Connection Modern routers broadcast two bands: 5GHz (super fast, but terrible at going through walls) and 2.4GHz (slower, but punches through walls and travels much further).
- The Fix: If you are in a room far from the router, your phone might be stubbornly trying to hold onto a weak 5GHz signal. Go into your device’s Wi-Fi settings and explicitly connect to the 2.4GHz network (often labeled with “2.4G” or “2G” at the end of the name). It will instantly give you a stronger, more stable connection in distant rooms.
💸 Phase 2: The Low-Cost Fixes (Under $100)
If moving the router didn’t do the trick, it’s time to bring in some hardware to bridge the gap.
5. Powerline Adapters (The Secret Weapon) If your dead zone is separated from the router by thick brick, concrete, or radiant floor heating (which contains metal mesh that blocks Wi-Fi), wireless extenders will fail.
- The Fix: Buy a Powerline Wi-Fi Adapter kit. These plug into your standard electrical outlets. One unit plugs in near your router and connects to it via Ethernet. The second unit plugs into an outlet in your dead zone and broadcasts a brand-new Wi-Fi signal. It uses your home’s existing electrical wiring to transmit the internet. It’s practically magic for older homes with thick walls.
6. A High-Gain Directional Antenna If your dead zone is in one specific direction (like a detached garage or a backyard patio), you can upgrade the antennas on your router.
- The Fix: Buy a high-gain (8dBi or 9dBi) directional antenna. Unlike the standard omnidirectional antennas that broadcast in a 360-degree circle, a directional antenna focuses all its radio energy into a tight, powerful beam in one specific direction, shooting the signal much further.
💰 Phase 3: The Ultimate Fixes (The Heavy Hitters)
If you have a large home, multiple floors, or just want a flawless, seamless connection everywhere, it’s time to invest in a proper network overhaul.
7. Upgrade to a Mesh Wi-Fi System (The Gold Standard) This is the absolute best solution for dead zones. Unlike a traditional router (which broadcasts from one single point) or a cheap extender (which cuts your speed in half), a Mesh system uses multiple “nodes” placed around your house.
- How it works: You put the main node where your modem is, and plug 1 or 2 satellite nodes into outlets in the dead zones. They communicate with each other to create a single, seamless blanket of Wi-Fi. As you walk from the living room to the bedroom, your phone automatically switches to the closest node without dropping the connection.
- The Verdict: It’s more expensive than a standard router, but for eliminating dead zones in a multi-room or multi-story house, it is unmatched.
8. MoCA Adapters (The Wired Wireless Hack) If your home is pre-wired with coaxial cable (the round, screw-in cables used for cable TV) in the rooms where you have dead zones, you have a hidden superhighway.
- The Fix: Buy a pair of MoCA (Multimedia over Coax Alliance) adapters. They convert the internet signal to travel over your home’s coaxial cables, and then convert it back at the other end. You can plug a MoCA adapter into the wall in your dead zone, and either hardwire your PC/TV to it, or plug a cheap Wi-Fi access point into it to create a blazing-fast, zero-loss Wi-Fi bubble in that room.
Map Your Network
Treating a Wi-Fi dead zone requires a shift in mindset. Stop thinking of your router as a magical box that just “gives internet,” and start thinking of it as a radio station.
If the radio station’s tower is hidden in a basement corner, the signal won’t reach the outskirts of town. By elevating the router, switching to the right frequency, or strategically placing mesh nodes, you are simply building better broadcast towers.
Don’t accept the dead zone as a fact of life. Start with the free tweaks, and if they fail, invest in the right hardware. You paid for internet in your whole house—it’s time you actually got it.